


Essential Guide to Lens Selection: How to Determine the ZOOM Range of a ZOOM LENS
In precision fields such as industrial inspection, machine vision, and scientific observation, ZOOM LENS serve as core optical components. The appropriate selection of their magnification range directly impacts imaging quality and inspection efficiency. However, faced with the overwhelming array of lens specifications on the market, how can one quickly pinpoint the magnification range that meets specific requirements?

I. Define Requirements: Starting from the application scenario, pinpoint two core parameters.
The core function of a ZOOM LENS is to dynamically balance between “wide-angle coverage” and “high-resolution detail” by adjusting magnification. Therefore, two key questions must be clarified before selecting a model:
- Maximum field of view requirement: The largest area of objects the lens must cover (e.g., overall workpiece dimensions, inspection area size, etc.).
- Minimum feature size requirement: The smallest details of objects that must be clearly distinguished (e.g., defect size, character height, texture spacing, etc.).
These two parameters determine the lower and upper limits of the lens magnification range, respectively, serving as the logical starting point for model selection.
II. Determining the Minimum Magnification: Derived from Maximum Field of View Requirements
The minimum magnification setting must ensure that the lens fully covers the largest possible area of the target object even at its lowest magnification. The calculation formula is: Minimum Magnification = Maximum Field of View Size (Diagonal Length) / Sensor Size (Diagonal Length)
Example:If the sensor size is 1/2 inch (8 mm diagonal) and the maximum workpiece area to be observed is 80 mm × 60 mm (100 mm diagonal), then the minimum magnification is: 100 mm ÷ 8 mm = 0.08 × (i.e., 0.08x, or 1:12.5)
Model Selection Recommendations:When selecting an actual model, choose a lens with a magnification slightly lower than the calculated value (e.g., 0.05x) to account for installation tolerances or variations in object dimensions.
III. Determining the Maximum Magnification Ratio: Derived from the Minimum Feature Size and Resolution Requirements
The upper limit magnification setting must ensure that the lens can clearly resolve the smallest details of the target object at maximum magnification. The core principle is that the lens resolution must be greater than or equal to the spatial frequency corresponding to the object's smallest feature size.
Step 1: Calculate the required resolution
Resolution is typically expressed in lines per millimeter (LP/mm), calculated using the formula: Required resolution = 1 / {2 × minimum feature size (mm)}
Example:If the minimum feature size to be resolved is 0.01 mm (e.g., a 10 μm defect), the required resolution is: 1/(2 × 0.01 mm) = 50 LP/mm
Step 2: Match the lens resolution
The lens resolution must meet the following requirements::Lens resolution ≥ required resolution
Lens resolution is typically specified by the manufacturer (e.g., 100 LP/mm). If the lens resolution is insufficient, the image will appear blurry even with adequate magnification.
Step 3: Calculate the upper limit multiplier
The maximum magnification ratio requires further verification based on the sensor's pixel size. The formula is: Maximum Magnification Ratio = {Lens Resolution × Pixel Size (μm)} / 1000
Example:If the lens resolution is 100 LP/mm and the sensor pixel size is 3.45μm, then the maximum magnification is: (100 × 3.45) / 1000 = 0.345x
Model Selection Recommendations:When selecting an actual model, choose a lens with a magnification slightly higher than the calculated value (e.g., 0.5x) to ensure resolution redundancy.
IV. Defining the Magnification Range: Combining the Lower and Upper Limits
Through the above steps, the theoretical magnification range of the lens can be determined: Lower limit magnification ≤ Actual magnification ≤ Upper limit magnification.
Example: If the lower limit magnification is 0.05x and the upper limit magnification is 0.5x, the selectable ZOOM LENS range is 0.05× to 0.5×.
V. Advanced Considerations: Variable Zoom Ratios and Continuous Zoom

1. Zoom Ratio: The ratio of maximum magnification to minimum magnification (e.g., 0.5×/0.05× = 10:1). A higher zoom ratio expands the lens's applicability across scenarios, but requires balancing cost and size considerations.
2. Continuous Zoom vs Fixed Magnification: Continuous zoom lenses enable smooth magnification adjustment, making them suitable for switching between multiple scenes. Fixed magnification lenses feature simpler construction and lower cost, ideal for single-scene applications.
VI. Advantages of POMEAS Lens Selection: Precise Matching, Efficient Delivery
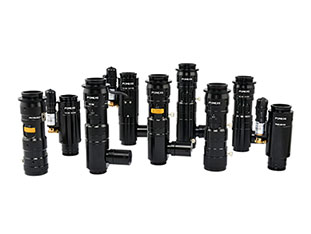
POMEAS offers a full range of ZOOM LENS covering a magnification range of 0.05× to 10×, supporting customized designs to meet diverse industry needs:
- High Resolution: Utilizes multi-layer coating and low-distortion design to ensure sharp detail;
- Large Zoom Ratio: Single lens covers multiple scenarios, reducing equipment costs;
- Rapid Delivery: Standardized products ship within 48 hours; customized solutions respond within 7 days.
Product recommendation
TECHNICAL SOLUTION
MORE+You may also be interested in the following information
FREE CONSULTING SERVICE
Let’s help you to find the right solution for your project!

 ASK POMEAS
  PRICE INQUIRY
  REQUEST DEMO/TEST
  FREE TRIAL UNIT
  ACCURATE SELECTION
 - APPICATION CASE
- RESOURCE CENTER
- DOWNLOAD CENTER
SOLUTIONS SUPPORT
- ZOOM LENS SELECTION TOOL
- TELECENTRIC LENS SELECTION TOOL
- FA LENS SELECTION TOOL
- ZOOM RATIO TABLE
- CERTIFIED MODEL
SELECTION TOOL
- WHY POMEAS
- FAQ
- PRIVACY POLICY
- TERMS OF USE
- DELIVERY & RETURN POLICY
CUSTOMER CARE
 ADDRESS
Add.:No.68, Chongwei Road, Baizhoubian, East district, Dongguan, China, 523000
CONTACT
 Tel:+ 86-0769-2266 0867
 Fax:+ 86-0769-2266 0867
 E-mail:marketing@pomeas.com

Wechat QR code
Software Copyright :2021SR0176001 抄袭必究, 技术支持:誉新源科技